Brief Warning....this will be the longest blog post of the 4. I apologize in advance for the Type A personality and detail listed.
If this were a marathon this would be about miles 16-20. Albeit I've never run a marathon in my life but if I did I'm guessing this would be an accurate description. Runners, any input? Ok so we are at the finishing stage.....sorta.....again with the construction knowledge. I never realized how quickly you get to the finishing stage and then the questions and details come in (insert wide eyed yellow faced emoji here).
We left off with Matt and me rocking out the ship lap downstairs. Here we go with the finished product for that great room. The ship lap is primed and not painted which is giving it that white washed look. We actually thought at one point it looked cool enough to leave as-is but then later changed our mind and painted it white anyways. Apparently changing your mind in the finishing stages is common place.....pretty sure we took a couple years off Uncle Jeff's life.
This saw was a modified saw for outdoor siding use that Dad dill lent me. This thing was perfect especially for some of the length of pieces we had. For those wondering when we ordered the ship lap it came in 3 lengths. 12' 14' and 16' which was a real treat brining downstairs. There was a lot of jockeying getting those boys down here.....buuuuut we did.


Remember that laser.....It's like OCD staring right back at me with a red eye.

From there we did decided to move the ship lap all the way up our stair well and finish off the ceiling with it as well. That was a little tricky but Uncle Jeff getting it started at the base and making the transition from the block wall to the drywall made it much easier to finish off. The plan was to move the light to the center of the ceiling rather than right over the door like it is now.

Thankfully Dad Dill had a few free days to help me finish it off up the sides and the ceiling. He fashioned a very "wide" scaffold of which Kim absolutely loved standing on those as well as those step stools to do the ceiling.
Again not sure if it needs said but....there's that laser again.

We looked at what seemed like forever at so many different options for what we wanted in this stairwell. I knew from the get go that I wanted a chandelier. I had in my head what I wanted but couldn't quite find it. We looked on Wayfair, through catalogs at the flower shop, at the gift show when Kim went and on and on. We finally settled on one that she found at the gift show which went for around $200. Quite honestly I wasn't 100% in love with but it was more of a we need something now so let's just get it.......those are always terrible decisions it seems like.
When she got home the company said they were no longer producing/selling that light fixture so we were back at square one. On to wayfair we went and again found a light that I was half in love with but it fit the bill of two things chandelier and produced light so just about when we were ready to drop $280 on the plastic she thought she would do a little varagesaling (sp?). I have never been more in love with an app such as this. Side plug here it has saved us tons of money on clothes, furniture etc. Just don't bid against us on it. :)
We found this gem below for $40...yeah $40 not even kidding. It was perfect. I wanted something a bit ornate but metal to give it some masculinity to it. It was very similar to our church chandeliers I liked which unfortunately our stately ranch is a tad small to fit those big chandeliers in a stairwell. :)
We went and picked this up and over to Menards where I bought some new wiring and chain and rewired this bad boy. We were all in for around $75 on this guy and it's probably my favorite or second favorite part of the reno.

The next three pictures are just some snaps of inspiration on what we wanted the look and feel of basement to be. It's not going to have natural light but we wanted it cozy. You'll see the ship lap in pic one, the door trimming in pic two and then a similar layout to our closets in pic 3.


Also at this point in the process this is where I brought in my brother in law Brent. Remember that pet project I mentioned??? Well that was a desk. I finally found one I wanted but unless I wanted to fork over about $3,000 on firstdibs.com for a 1800s french one I wasn't gonna have it. Enter Brent. He had spent the past year tearing down some excellent beams and ship lap as well as 2 x 12s......legit 2 x 12s out of the families' old Corncrib on the farm.
Many of you may have seen him post some of his projects he's done like finishing his own basement, children's tables, side tables, etc. I thought hey, what can it hurt to ask him if he would like a shot at doing this. Below is the picture of the desk I wanted. Nothing complicated but I wanted a nice deep desk for work for Kim, or even when I'm working on a home project/Sunday School lessons.

Here is the wood after he spent some time planing it down. This wood was nothing short of GORGEOUS. I don't even know if as a male I can describe a finished woodworking product as such but that's the only word I can think of. This natural wood was excellent. In the end I didn't have him varnish/stain/seal it or anything. The natural wear was absolutely perfect. Wait till you see how it turned out.

In the meantime while Brent was working on that, uncle Jeff moved back in and well.....

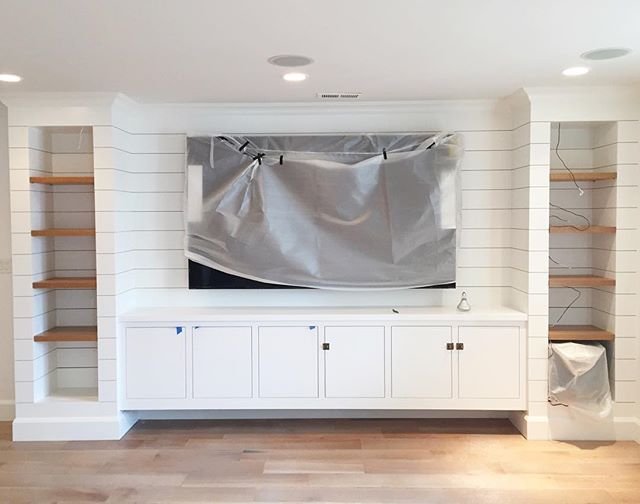
You can see how the cabinet/bed space is beginning to come together. The recessed area will be for the bed as you'll see later and the bench has two piano hinged doors to open and store toys underneath. This is great for the boys.

Right before Jeff moved back in our basement he dropped off the wood out at my dads house where he has a giant vacuumed paint booth to get the finish as Eddie would say....Reeeeaaal Nice. :)
This would also be the part I remind you that It was July, high 90s, 70%+ humidity. These pictures showed about 1/3 of what my dad ended up priming and painting. Uncle Jeff standing with the closets here gives you an idea as to their height and storage capacity.
So let me say this. As we finished unloading my dad basically had the physical/mental decision to:
A) Have a heart attack
B) Have a stroke
C) Go Cain and Abel on me
D) Move out of the state
E) Remove me from the will
Well he's in too good of shape to have either "A" or B happen......thank you Grandma Zeller. As a professing believer in Christ praise the Lord "C" wasn't even an option. Mom would never in a million years let him take her from her grand-babies so bye bye "D".......which leaves us with "E". I only have to work until....I die....but hey, I have expertly primed and painted trim and closets that will store my kids toys and such for as long as they're under my roof! Yeah that was worth it.....I think.


Ok So this phase has it's own chapter I feel like. Below is an inspiration pic for the doors to the storage and utility rooms. Circa the old days in school where the doors had the letters painted on them. Simple right, find an old door, restore it and label the glass. Easy.....not even close. These doors basically put Kim in one corner and me in the other in UFC #210 and let's just say I'm the untrained guy wanting to crawl out of the cage.
I'll save you the pure boredom but let me sum these doors up in a couple words. Old doors + unknown lead paint + power sanding (outside thankfully) + kids around = lead scare/paranoia.
Got that???? So yeah we in essence had to use paint stripper which is pretty much more toxic than the lead paint to remove the paint outside, then a process of wet sanding it where Kim was really ready to kill my type A OCD after we visqueened off the area and wore.....well......you'll see.

Utility door below:

Storage door below:

Dane's paranoia:

Personally I think she looks pretty sexy in a respirator....I know I know, typical male.
*side note - her hands aren't actually that big. :)

Yeah so when you see those HGTV shows where they say they restored an old door.......this is it right here. Looking back the $500 we saved was probably not even worth the time and effort.

As we were working on that Jeff had the closets installed and got our awesome trim up and around the doors. I loved the detail we went with here since the walls were so linear.


Here is a shot of the murphy bed before the wood was primed and painted by my bride.

So here is the final touch up stages of paint and trimming out before the carpet and furniture arrived. I actually discovered in this stage that while I absolutely abhor painting I found caulking to be extremely relaxing.
You can get an idea of the color scheme here and that we ended up painting that beam black. It really pops and we are glad we did it.


So there you have it. The last painstaking steps before the furniture and carpet arrived.
Up next - the finished project.
No comments:
Post a Comment